

You have services that you want to make accessible from outside? A Plex, a password manager, a website, … You use a non professional connection with a dynamic external IP ? then you must have asked yourself the question of how to host more than one service with only one external IP address !
To solve this problem we will divide the problem in several parts. First, we will see how to link a dynamic external IP with a domain name. In a second step we will see how to create and redirect subdomains. And finally we will see how to link subdomains with the services you host.
Dynamic/Static IP #
As described in the intro one of the big problems of self hosted on a non professional connection is that in general the external IP of the router is not fixed. That means that at each restart, the IP has a chance to change. This is a big problem, indeed to link a domain to our site for example, the DNS must know the server IP and more precisely the external IP of our network. A solution would be to manually change the IP at each change, but this is clearly not practical and makes our service infrastructure very unstable. But there is an automatic solution to this problem: DDNS.
Dynamic DNS (DDNS) is a method of automatically updating a name server in the Domain Name System (DNS), often in real time, with the active DDNS configuration of its configured hostnames, addresses or other information. — Wikipedia
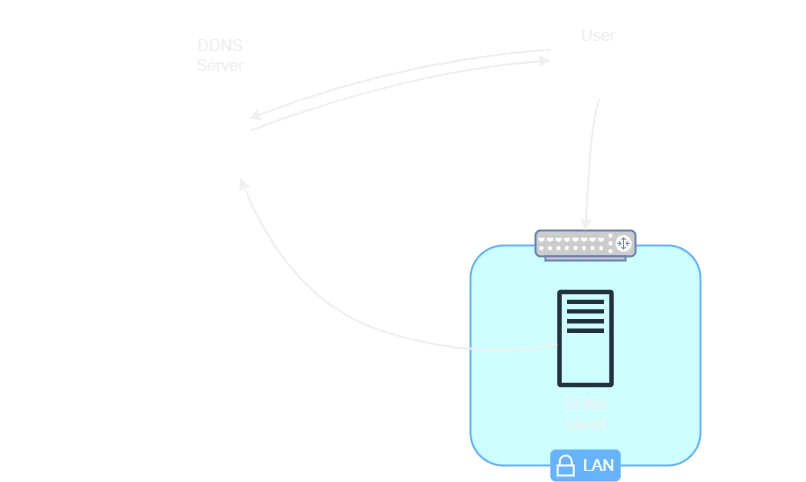
The operation of DDNS is separated into 3 parts:
-
A device in your network sends its IP and a Token ID to the DDNS server
-
The DDNS server receives the packet with the token and the IP, it makes the link with your duckdns sub-domain
-
You make a request on your duckdns sub-domain, you are redirected to your IP
When changing IP the DDNS server just has to update with the new IP. The IP address is usually updated every 10 minutes.
In my case I decided to use DuckDNS, it’s a free service and easily configurable. First you will have to create an account with the service of your choice. Then you have to get your token, it’s your unique identifier that will allow DuckDNS to identify you.

You will now have to create a sub domain to the duckdns.org domain. To do this, simply fill in the “sub domain” field and click on “add domain”.

Then go to your docker manager to install the linuxserver/duckdns docker. The docker compose is quite simple, you just have to indicate the two following elements:
SUBDOMAINS=xxxxx.duckdns.org
TOKEN=xxxxxxxx-xxxx-xxxx-xxxx-xxxxxxxxxxxx
You can then launch the docker, if all is well configured you can return to DuckDNS and verify that it has received your IP:

Sub-domain creation #
Now that we have a domain at DuckDNS, we will have to link our personal domain/sub-domain to the DuckDNS sub-domain.
Go to your domain name manager, for my part it’s OVH. If it’s not your case, it’s okay, the process is the same.
To do the redirection you have to create DNS entries of type CNAME.
A Canonical Name record (abbreviated as CNAME record) is a type of resource record in the Domain Name System (DNS) that maps one domain name (an alias) to another (the canonical name). — Wikipedia
To create a CNAME entry, all you need is a sub-domain and a target :
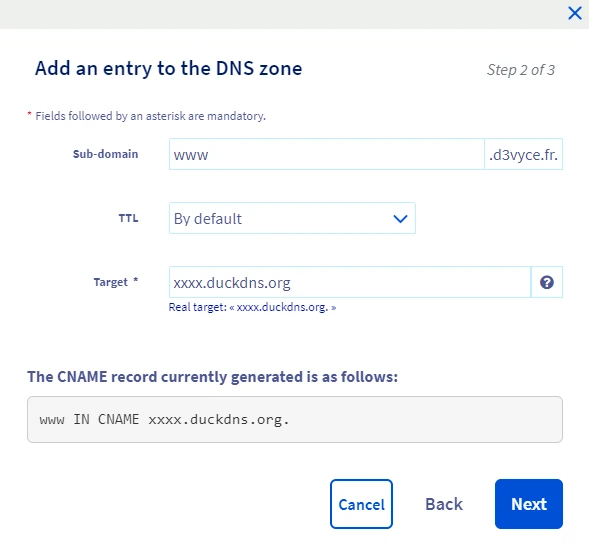
In this example I create a sub-domain “www.d3vyce.fr” which redirects to the DuckDNS domain “xxxx.duckdns.org”. Once the information is propagated on the different DNS servers, I should be able to access the IP of my box via this sub-domain.
On the same principle we can create other subdomains:
www	IN	CNAME	xxxx.duckdns.org.
plex	IN	CNAME	xxxx.duckdns.org.
radarr	IN	CNAME	xxxx.duckdns.org.
If you have a fixed IP, you should make a type A entry rather than a CNAME entry, example :
www IN A xxx.xxx.xxx.xxxReverse Proxy #
We now have sub-domains that are linked to a DDNS which itself updates our IP dynamically. But how to link a sub-domain to an application. For example :
- Plex -> plex.d3vyce.fr
- Ghost -> www.d3vyce.fr
- …
To do this we will set up a Reserve Proxy.
A reverse proxy server is a type of proxy server that typically sits behind the firewall in a private network and directs client requests to the appropriate backend server. — Nginx.com
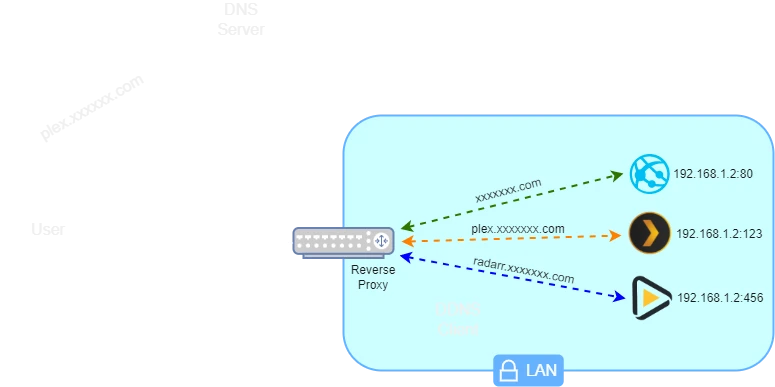
Globally the reverse proxy will inspect the source domain to determine which local IP/Port to redirect the request to.
The reverse proxy I chose is Nginx Proxy Manager. It is a reverse proxy that has a web interface and more importantly a Let’s Encrypt SSL certificate manager integrated! This will allow us to use our services via HTTPS easily and without having to set up self-signed certificates.
First we will configure the port forwarding on our router: this will allow us to redirect our HTTP/HTTPS ports to our future docker Nginx Proxy Manager.
To do this, go to the administration interface of your router, for me it is accessible at the following address: http://192.168.1.1. In the network configurations look for a NAT tab. Create two rules as follows:
Name	External Port	Internal Port	Device
HTTP	80		1480		[Docker IP]
HTTPS 443 14443 [Docker IP]Now let’s install our reverse proxy via docker. The docker-compose is quite simple the only elements to change are :
ports:
      # These ports are in format <host-port>:<container-port>
      - '80:80' # Public HTTP Port
      - '443:443' # Public HTTPS Port
The port must correspond to the internal port you have configured in your NAT, in my case it gives :
ports:
      # These ports are in format <host-port>:<container-port>
      - '1480:80' # Public HTTP Port
      - '14443:443' # Public HTTPS Port
You can now start the docker, if all goes well you should be able to go to the following address to access the web interface: http://[IP docker machine]:81. You can now connect with the following login/password:Email:
admin@example.com
Password: changeme
After creating a user, we can add our first service! To do this go to the Hosts -> Proxy Hosts tab. Now click on “Add Proxy Host”.
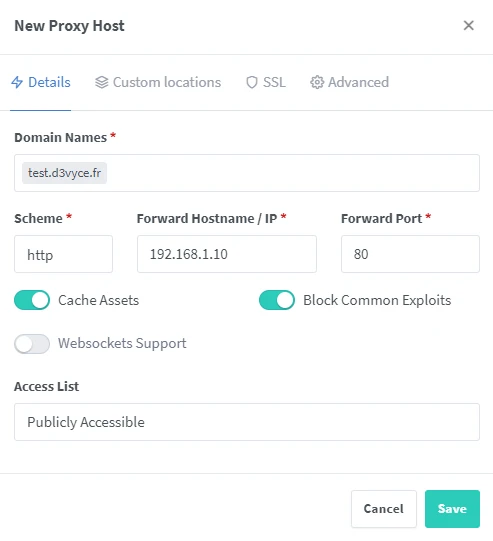
This is where we will have to fill in our sub-domain, local IP of the service and its port. In the example above, I configure the sub-domain “test.d3vyce.fr” with the local web server which is at the address 192.168.1.10:80.
The options “Cache Assets” and “Block Common Exploits” are not mandatory but recommended.
Now let’s configure our SSL certificate.
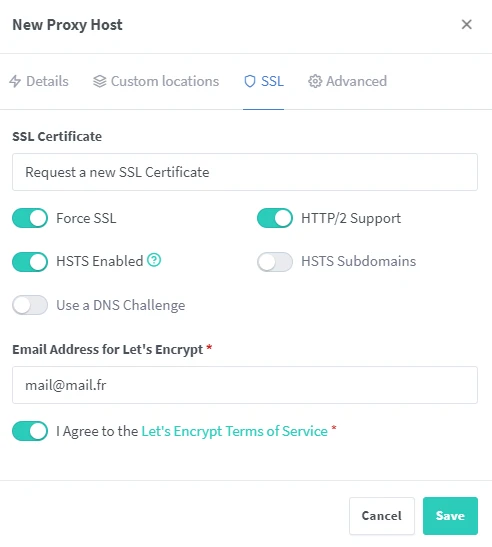
Select the option “Request a new SSL Certificate” then the options “Force SSL”, “HTTP/2 Support” and “HSTS Enabled”. Then fill in our email and accept the terms of service. You can now save. After a few seconds you should see the status “Online” for your subdomain. If you have no errors you can now access your service with this subdomain! Using the same principle, you can setup other services.
Conclusion #
You now have a complete setup for a real selfhosting network. But that’s not all, it’s a simple setup for which we can add other things. Nginx Proxy Manager already has other features, for example the “Access Lists” which allow a simple authentication system. We could also set up a SSO system to increase security, a proxy and fail2ban with CloudFlare, … (articles coming soon will cover these topics).